Tom Harrison Maps
Map User Manual
Contents:
Introduction:
The Tom Harrison Maps app for Android is a personal navigation and tracking application, intended for use by outdoor enthusiasts. The app allows for purchase, download and use of many of the msps available from Tom Harrison Maps, overlayed on top of the OpenStreetMap background map. Using the GPS in your phone or tablet, your position on the map is shown, and your track can be logged.
The Tom Harrison maps app uses OpenStreetMap map data, and the osmdroid software library. Tom Harrison map data is © Tom Harrison Maps. OpenStreetMap map data © OpenStreetMap contributors, CC-BY-SA.
Safety:
No single navigation aid is a replacement for experience and preparation. All safe backcountry travel practices should be followed.
Map Screen:
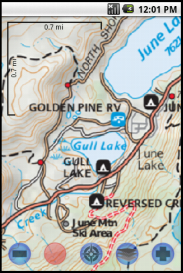
The map screen is the first screen you see, after the end user license agreement. It is a full-screen view of the map, and defaults to showing the your position.
Map Features:
-
Buttons:
- Zoom Out: Zoom out one level.
- Record: Record your track.
- Center/Folow: Center the map on your current location.
- Layers: Open a dialog to select the displayed map layers.
- Zoom In: Zoom in one level.
- Scale: At the top-left of the screen, the scale of the map is displayed. The scale is shown in miles by default, but can be set to meters or nautical miles from within the settings screen. The scale bar can also be completely disabled from within the settings screen.
- Compass: At the top-right of the screen, if your device has a built-in magnetic compass, a compass rose is displayed.
Controlling The Map:
- Pan map: Drag the map with your finger to pan north, south, east or west.
- Zoom: Tap the plus or minus buttons on the bottom left or right, to zoom in or out. Double-tap on the screen to zoom to that location. Pinch the map with two fingers to zoom in or out.
Map Screen Options:
Press your device's menu button to pop-up the options menu for the map screen.
- Help: Open a browser to this page.
- Map Manager: Select Tom Harrison Maps to purchase and download.
- Map Legend: Pop-up a legend, detailing each road, trail and marker type.
- Track: Options for tracking.
- Waypoints: Open a list of saved waypoints.
- Settings: Open the settings screen.
Map Manager:
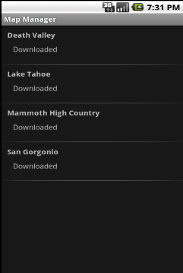
- Purchase Map: Click on a map from the list that says "Available for purchase". A Google Market window will open to confirm the purchase. Once the purchase completes, the map will begin downloading.
- Zoom to Map: Click on any map that says "Downloaded", and select "Zoom to Map". This will bring you to the map screen, zoomed to the location of the map you selected.
- Delete Map: To conserve space, you may delete any map you have purchased and downloaded. You will be able to re-download the map at any time.
- Download Map: Any map previously purchased and deleted, may be downloaded again at no additional cost. Click on the map, and select "Download Map".
Tracks:
- Track Me: On the map screen, press the red record track button to begin recording your track to an internal database.
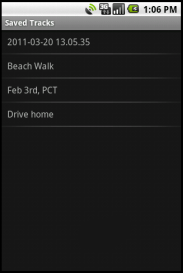
- Browse Tracks Option: From the map screen, press the menu key, and select tracks. Select "Browse Tracks". This will open a list of your saved tracks.
- Save Track Option: "Save Track". This will allow you to name, and save your track to a file in either GPX or KML format. GPX contains more detail, and is suitable for geo-referencing pictures. KML can be opened directly in Google Earth or Google Maps.
- Clear Track Option: From the map screen, press the menu key, and select tracks. Select "Clear Track". This will clear your current, unsaved track.
- Track Browser: The track browser lists all of your saved tracks. Click on any track record to delete, or email track file.
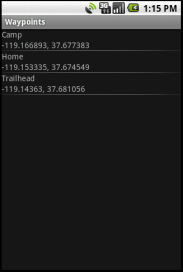
Waypoints:
- Create a Waypoint: To manually create a new waypoint, press and hold a location on the map screen. After 2 seconds, a waypoint form will pop-up, where you may name and save the new waypoint.
- Edit a Waypoint: Tap any existing waypoint on the map screen to return to the waypoint edit screen.
- Show All Waypoints: From the map screen, press the menu key, and select waypoints. An alphabetized list of all your saved tracks will be displayed.
- Save Waypoints: From the waypoint list screen, press the menu key and select Save. You will be prompted for a file name, and a format, either GPX or KML.
- Email Waypoints: From the waypoint list screen, press the menu key and select Email Waypoints. Your waypoints will be saved to a file, and attached to a new email composition window in your email app of choice.
- Import Waypoints: From the waypoint list screen, press the menu key and select Import. You can select any GPX or KML file containing waypoints to import into the app database.
- Delete all Waypoints: From the waypoint list screen, press the menu key and select Delete All. This will delete all saved waypoints.
Settings:
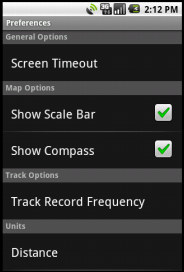
- Screen timeout: You may override the system default screen timeout, which may be usefull at times such as when in a car.
- Show Scale Bar: Select whether or not to display the scale bar on the map screen.
- Show Compass: Select whether or not to display the compass rose on the map screen.
- Track Record Frequency: Select what interval to use when saving your track. Smaller time intervals create larger files, with greater accuracy.
- Distance Units: Select what distance unit to use: Miles/Feet, Kilometers/Meters or Nautical Miles/Feet.
Tom Harrison Maps for AndroidTM
Tom Harrison Maps: San Gorgonio Wilderness for AndroidTM
Tom Harrison Maps: Mammoth High Country for AndroidTM
More coming soon!
September 26th
Tom Harrison Maps: v1.0 released! New maps! Death Valley and Lake Tahoe now available. Mammoth High Country and San Gorgonio apps rolled into all-in-one app.
June 5
Tom Harrison Maps: San Gorgonio Wilderness v1.0 released!
March 20
Tom Harrison Maps: Mammoth High Country v1.0 released!
![]()
![]()